When it comes to holiday nail designs, nothing says festive and cute quite like Christmas bow nail art! Whether you prefer simple red ribbons or sparkly metallic bows, this style can add an instant touch of holiday magic to your look. The best part? You can easily create bow nail art at home with a few simple tools and polishes.
From elegant matte looks to glittery 3D bow designs, there’s a bow manicure for every mood and skill level. Below are 15 creative and easy-to-try Christmas bow nail ideas, each explained step-by-step so you can get inspired for your next holiday manicure.
Table of Contents
- 1. Classic Red Bow on White Base
- 2. Gold Glitter Bow Tips
- 3. Matte Green Nails with Red Ribbon Bows
- 4. Silver Base with 3D Red Bow Stickers
- 5. French Tips with Mini Red Bows
- 6. Candy Cane Bow Nails
- 7. Black Matte Nails with Gold Bows
- 8. White Pearly Nails with Red Satin Bow Accents
- 9. Red Nails with Gold Ribbon Stripes and Bows
- 10. Green Glitter Nails with White Bow Accent
- 11. Nude Base with Metallic Silver Bows
- 12. Pink Matte Nails with White Polka Dots and Bows
- 13. Blue Snowflake Nails with Silver Bow Accent
- 14. Burgundy Gloss Nails with Velvet Bow Stickers
- 15. Glitter Ombre with Transparent Bow Accent
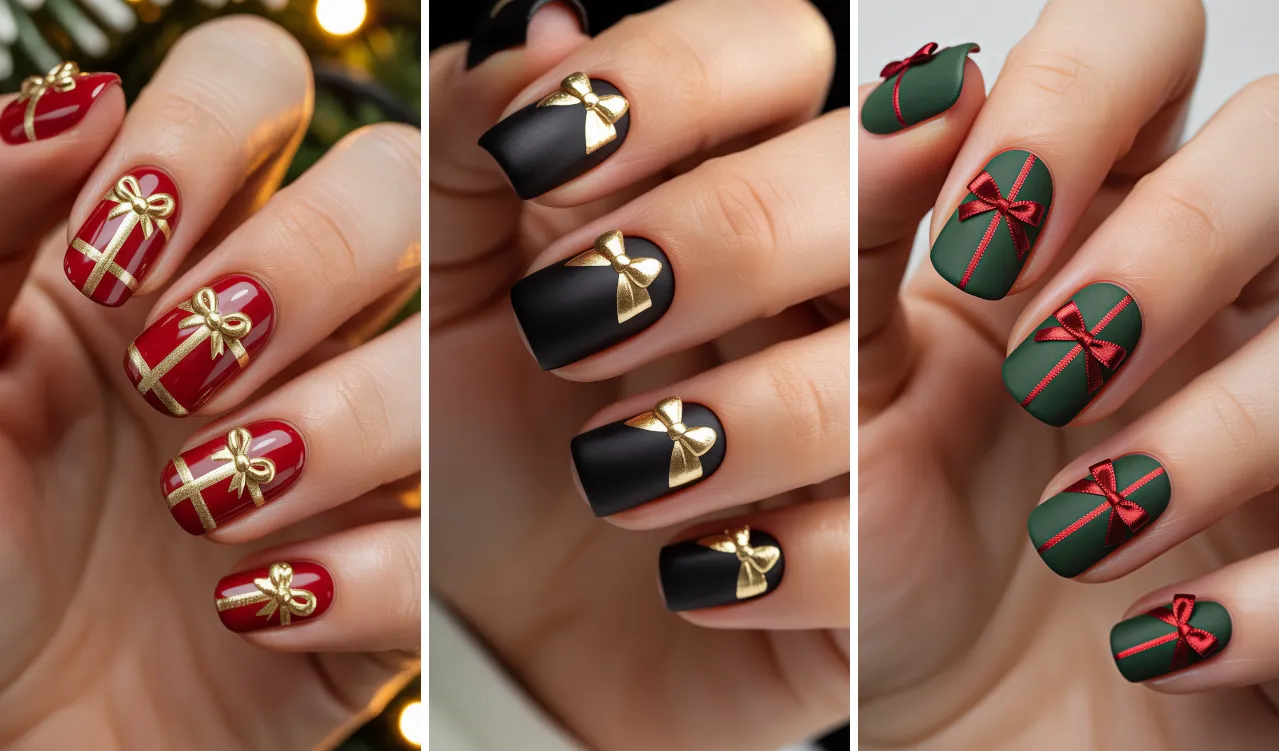
1. Classic Red Bow on White Base
Start with a clean, white matte or glossy base coat on all your nails. Once dry, use a thin nail brush or striping tape to draw a small red bow near the tip or center of your nail. Add a tiny gold dot at the knot for detail. This classic red-on-white design gives off a cozy, Christmas-gift vibe.
The contrast between the bold red bow and the clean white background makes the design pop. It’s simple but festive — perfect for beginners who want a traditional holiday look without too many steps. Pair it with red outfits or cozy Christmas sweaters for the full effect.
2. Gold Glitter Bow Tips
Paint your nails with a soft nude or light pink base coat. Using gold glitter polish, create a bow shape at the tip of each nail. Outline the bow with a fine white or black line for definition, then seal it with a glossy top coat.
This design feels glamorous and sparkly but still subtle enough for everyday wear during the holidays. The glitter catches the light beautifully, giving your nails a festive glow. Perfect for holiday dinners or New Year’s Eve parties.

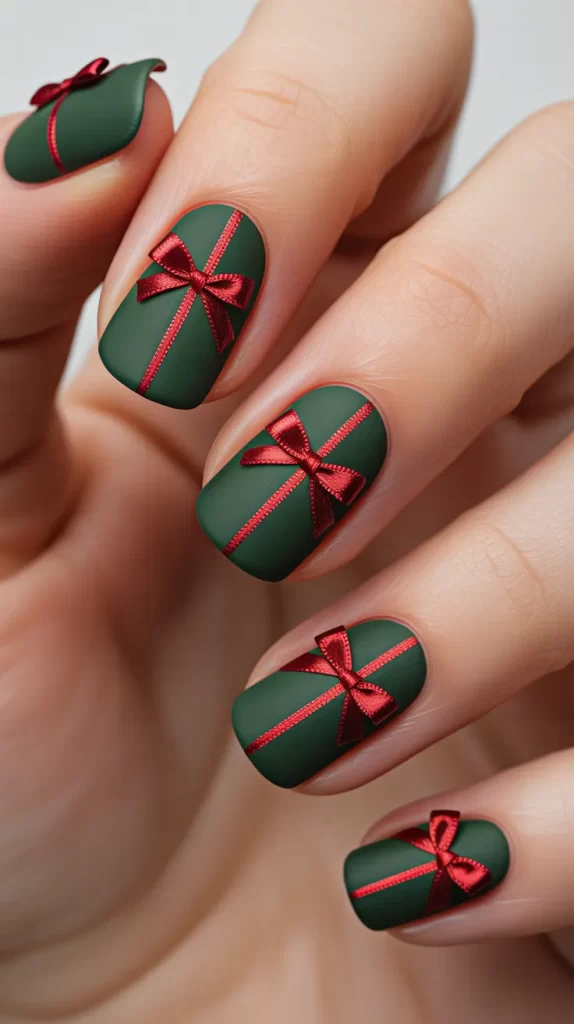
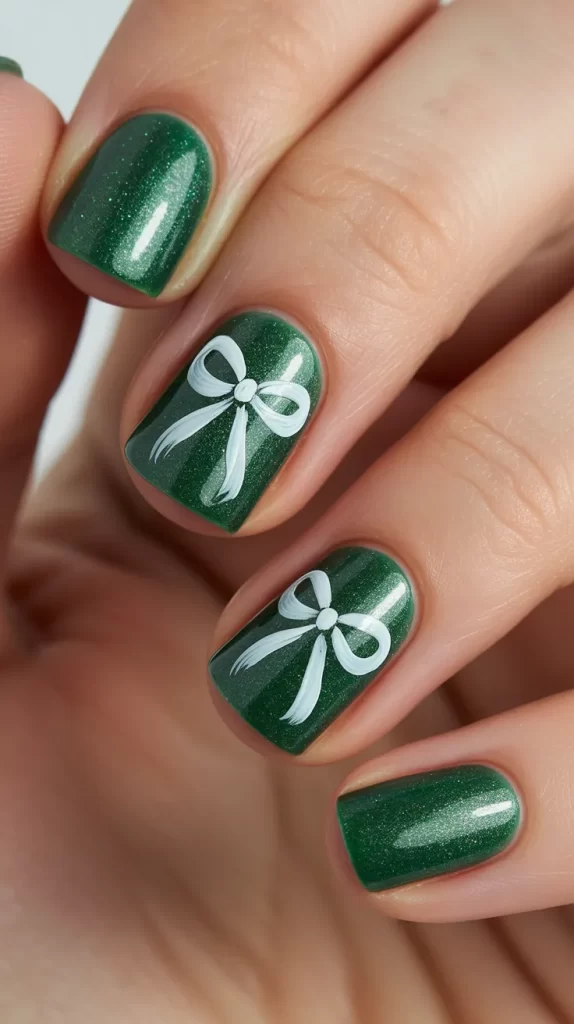
3. Matte Green Nails with Red Ribbon Bows
Go for a matte dark green polish as your base. Once it’s dry, use red nail polish or a fine brush to paint a ribbon across the nail with a neat bow in the center. The combination of matte green and shiny red gives a wrapped-gift effect that’s both chic and fun.
This style brings the spirit of Christmas right to your fingertips. The matte base tones down the brightness, making the red bow pop even more. It’s great for short to medium nails and can easily be done with nail stickers if you’re in a hurry.
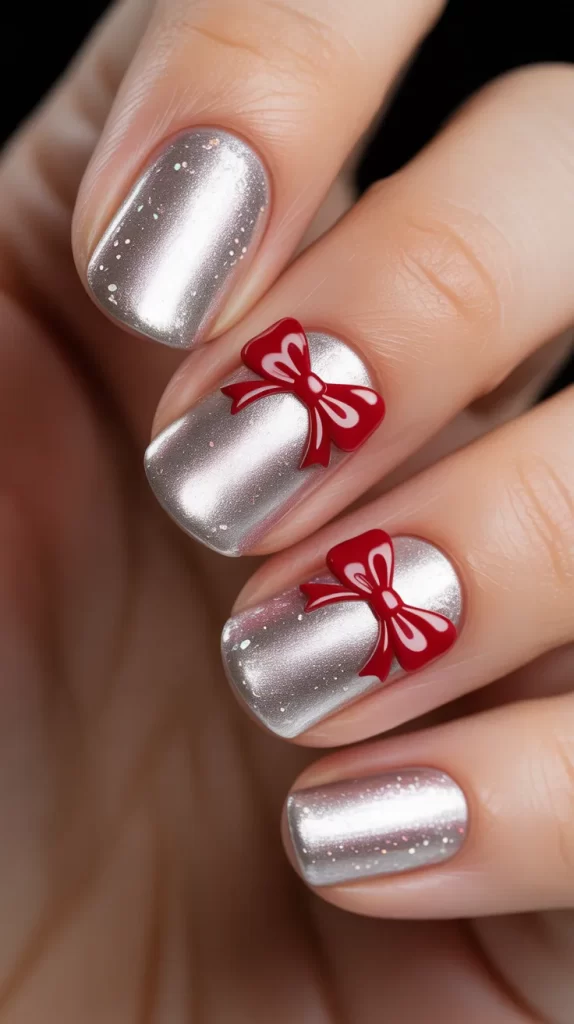
4. Silver Base with 3D Red Bow Stickers
Apply a shiny silver polish as the base on all nails. Once dry, place small 3D bow stickers or rhinestone bows near the cuticle or center. Secure them with a strong top coat to hold them in place.
The metallic silver adds a festive shimmer, while the raised red bows give your nails texture and style. This look is perfect for parties or photo ops, adding a professional salon look with minimal effort.
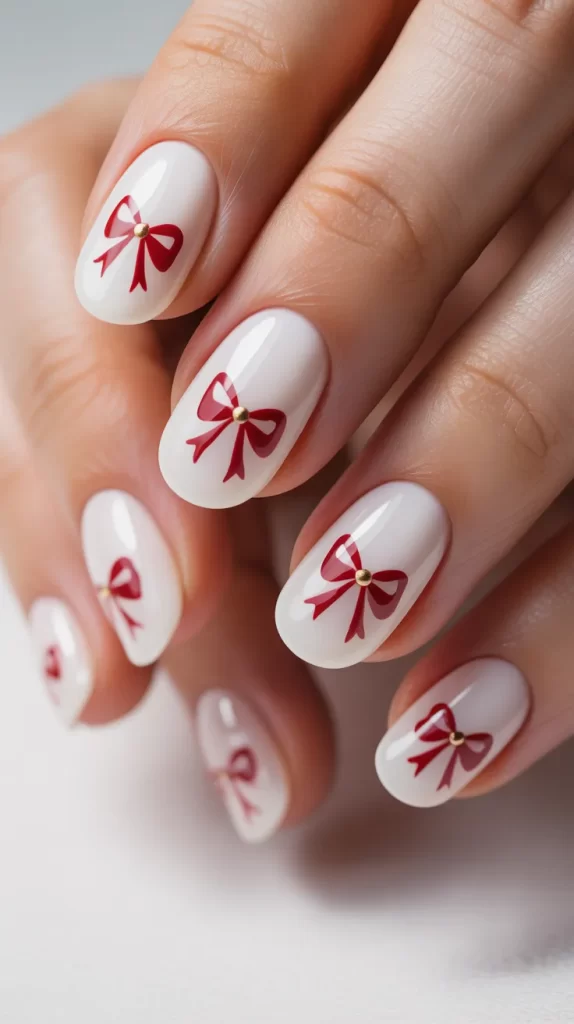
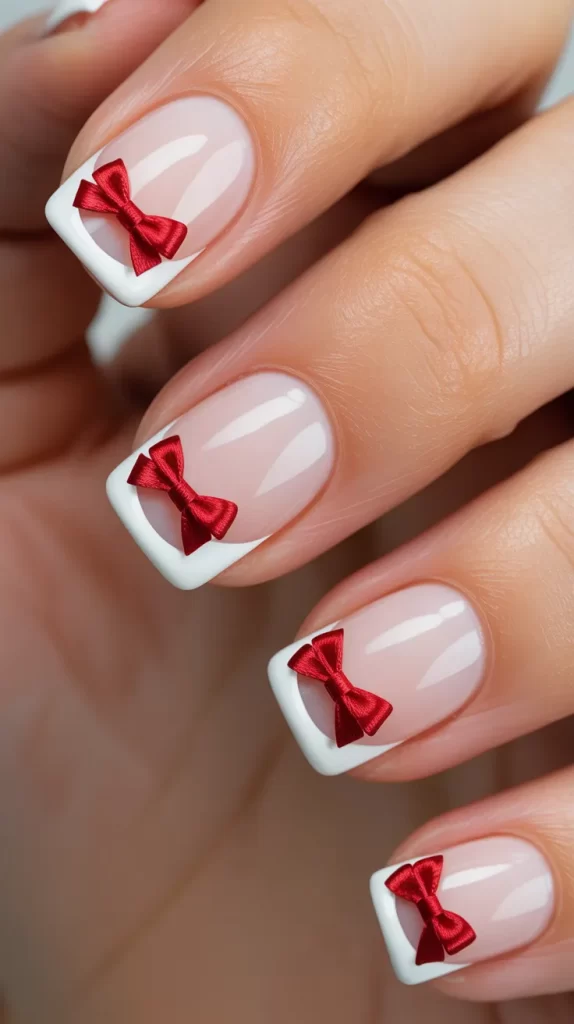
5. French Tips with Mini Red Bows
Start with a pale pink or nude base and create a French tip using white polish. Once dry, add a tiny red bow right where the white and nude colors meet. Keep the bows small for a cute and delicate finish.
This nail art is timeless with a festive twist. The red bows bring a pop of color to the classic French manicure, making it both sophisticated and fun. Great for short or long nails alike.
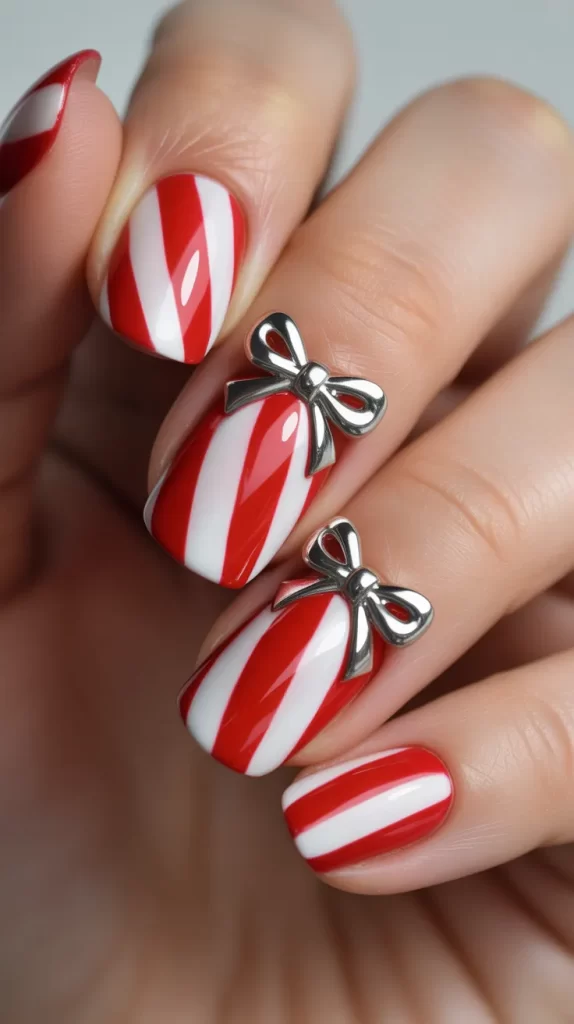
6. Candy Cane Bow Nails
Use alternating red and white stripes as your base to create a candy cane effect. Once dry, paint or apply a small silver or gold bow on one or two accent nails. The result is playful, bright, and full of Christmas cheer.
This nail art is ideal for those who love colorful and bold looks. The candy cane stripes bring in traditional holiday patterns, while the bow adds a charming finishing touch.
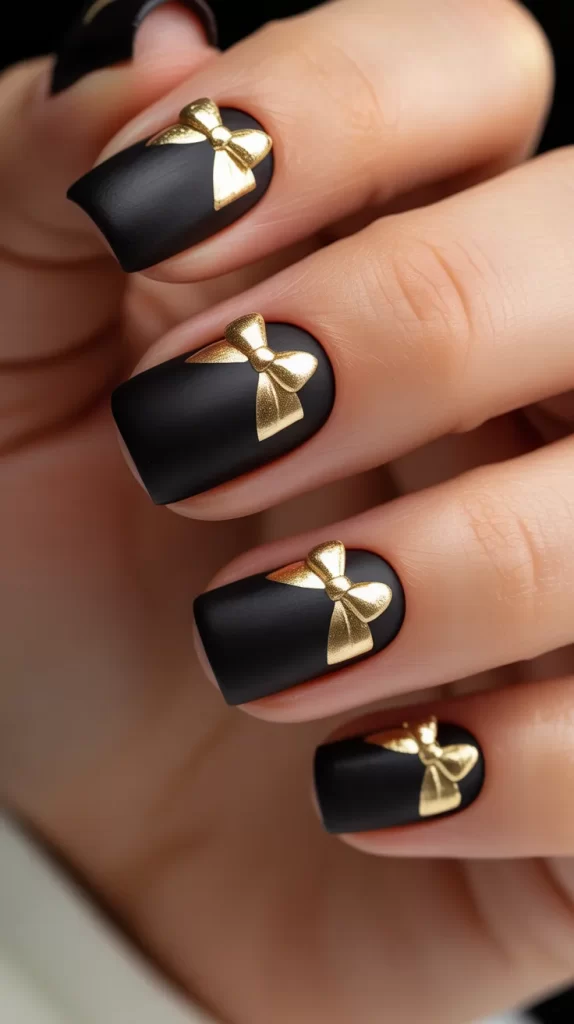
7. Black Matte Nails with Gold Bows
For a sophisticated twist, paint your nails matte black. Then, use gold nail polish or foil to draw small bow shapes at the base or tips of your nails. The contrast of black and gold looks elegant and modern.
This design is perfect for evening events or anyone who prefers a more luxurious, non-traditional Christmas color palette. The matte finish adds depth and makes the gold details shine beautifully.
8. White Pearly Nails with Red Satin Bow Accents
Apply a pearly white polish to all your nails. Then, draw or stick small satin red bows on one or two nails. You can use nail glue or soft fabric bow stickers for an extra realistic look.
The combination of white shimmer and satin red creates a soft, romantic holiday look. This design works beautifully for winter weddings or holiday gatherings where you want a touch of elegance.

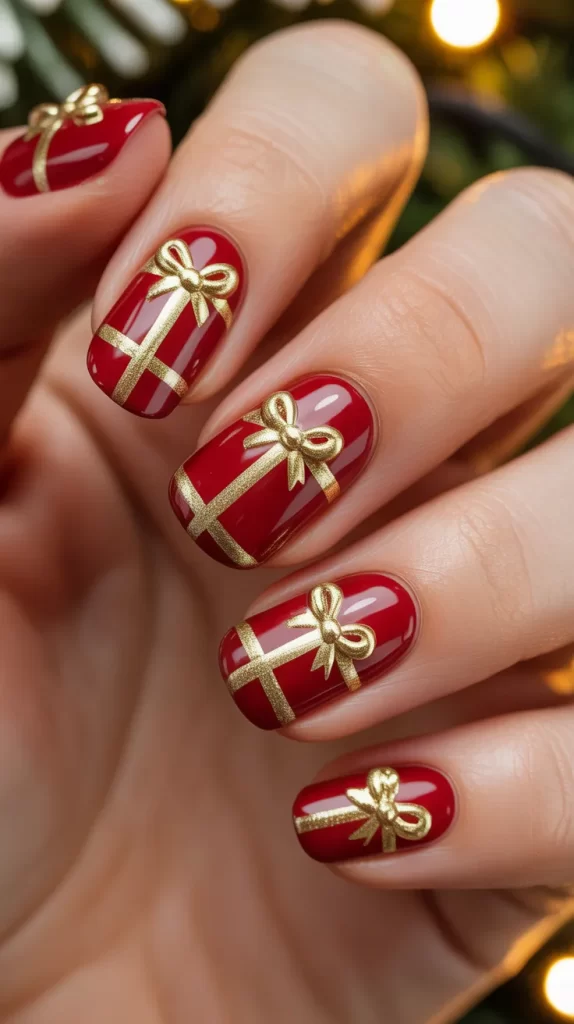
9. Red Nails with Gold Ribbon Stripes and Bows
Start with a glossy red base. Once it’s dry, apply thin horizontal and vertical gold lines to form a “gift wrap” look. Finish with a small gold or white bow at the crossing point of the lines.
This is one of the most iconic Christmas bow nail designs. It resembles wrapped presents, instantly bringing holiday joy to your fingertips. It’s also great for matching with Christmas outfits.
10. Green Glitter Nails with White Bow Accent
Choose a deep green glitter polish for all your nails. On one accent nail, paint a neat white bow at the center or tip. The sparkle from the glitter and contrast from the white create an eye-catching holiday look.
This style is perfect for anyone who loves a bold, twinkly Christmas look. It’s fun, festive, and works great for parties. You can add rhinestones to the bow for extra sparkle.
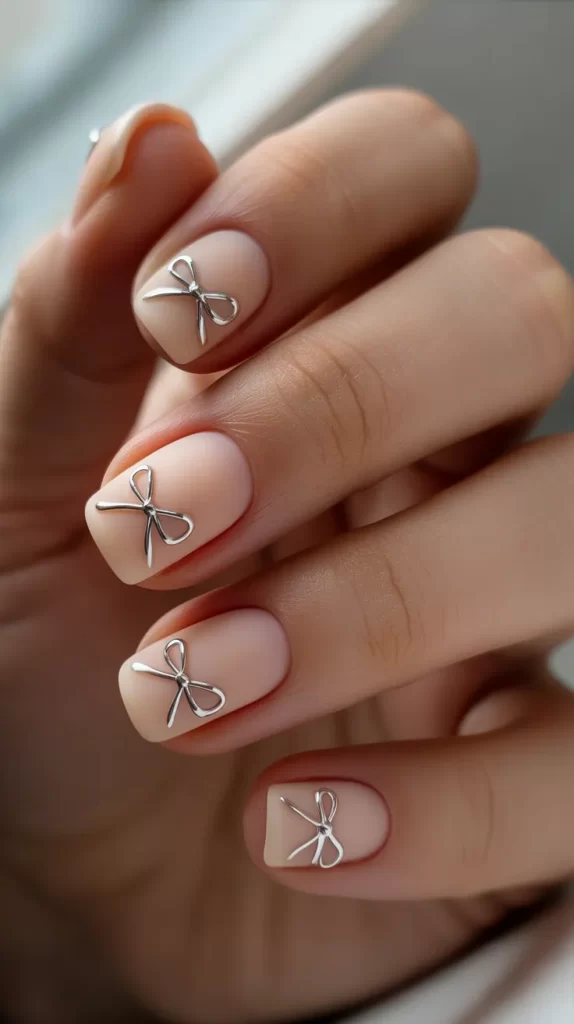
11. Nude Base with Metallic Silver Bows
Start with a nude or beige matte polish. Then, use silver polish or foil to create small metallic bows near the tips or sides of your nails. The subtle base makes the metallic pop without being too flashy.
This is a classy design that works for both formal and casual settings. It’s elegant, simple, and easy to achieve even for beginners.
12. Pink Matte Nails with White Polka Dots and Bows
Paint your nails matte pink and add small white polka dots all over. Then, on one or two accent nails, draw a white bow at the base. The look is cute, girly, and festive.
This nail art is great for a soft Christmas aesthetic. The pink-and-white combo gives a cozy candy-inspired look, perfect for casual holiday fun.

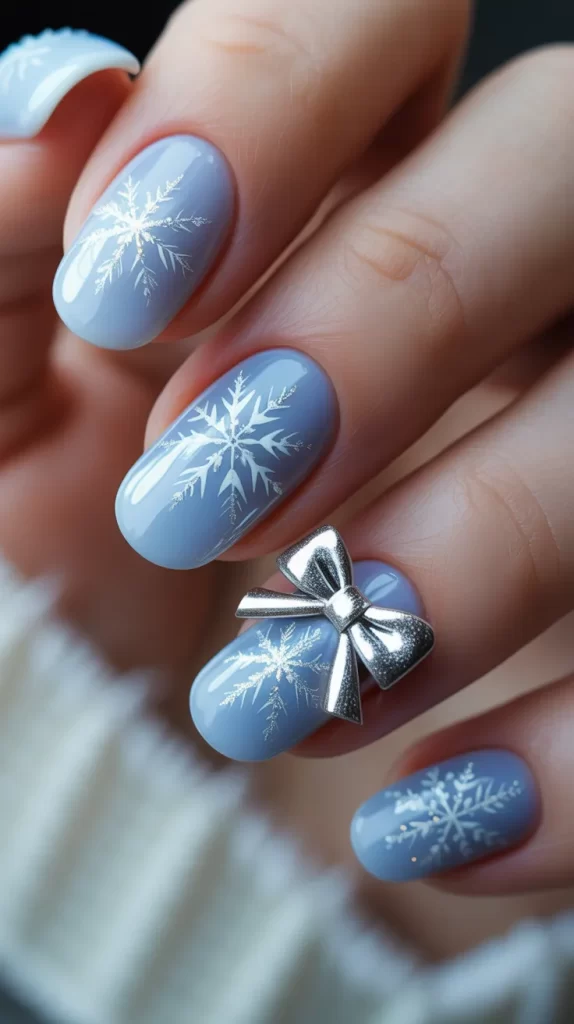
13. Blue Snowflake Nails with Silver Bow Accent
Paint your nails icy blue with a few white snowflakes scattered on top. On one accent nail, add a delicate silver bow to tie the winter theme together. The combo of blue and silver gives a frosty, elegant look.
This design works beautifully for wintertime and looks amazing with cozy sweaters. It’s festive but still refined enough to wear past Christmas.
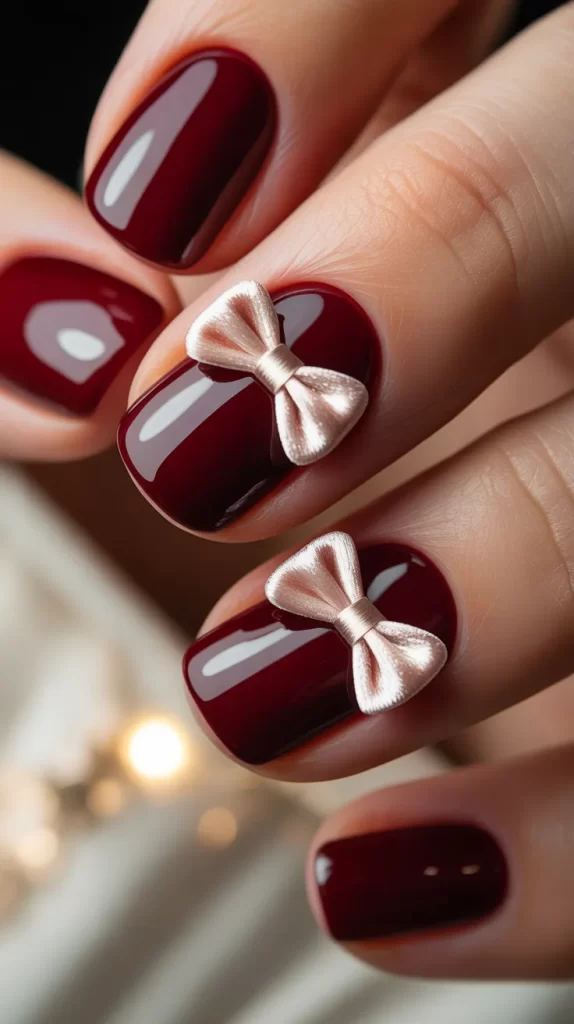
14. Burgundy Gloss Nails with Velvet Bow Stickers
Use a glossy burgundy polish as your base. Then, place soft velvet or fabric bow stickers on one or two accent nails. The texture of the velvet adds depth and luxury to your manicure.
This design looks expensive and cozy at the same time. The deep burgundy paired with the soft texture feels very Christmas-ready, ideal for formal dinners or office parties.
15. Glitter Ombre with Transparent Bow Accent
Apply a glitter ombre effect using silver and rose gold glitters, fading from the tips. On top, add a transparent or jelly-style bow sticker for a modern, minimal finish.
This nail art is trendy and eye-catching without being overdone. The transparent bow adds a playful touch to the sparkling ombre. Perfect for anyone who loves shimmer and subtle details.
Final Tips
- Always use a top coat to protect your design and keep it long-lasting.
- Try bow nail stickers or nail stamps if hand-painting feels hard.
- Use matte or glitter finishes to change the mood of the design.
- Mix one bold accent nail with simpler designs for balance.