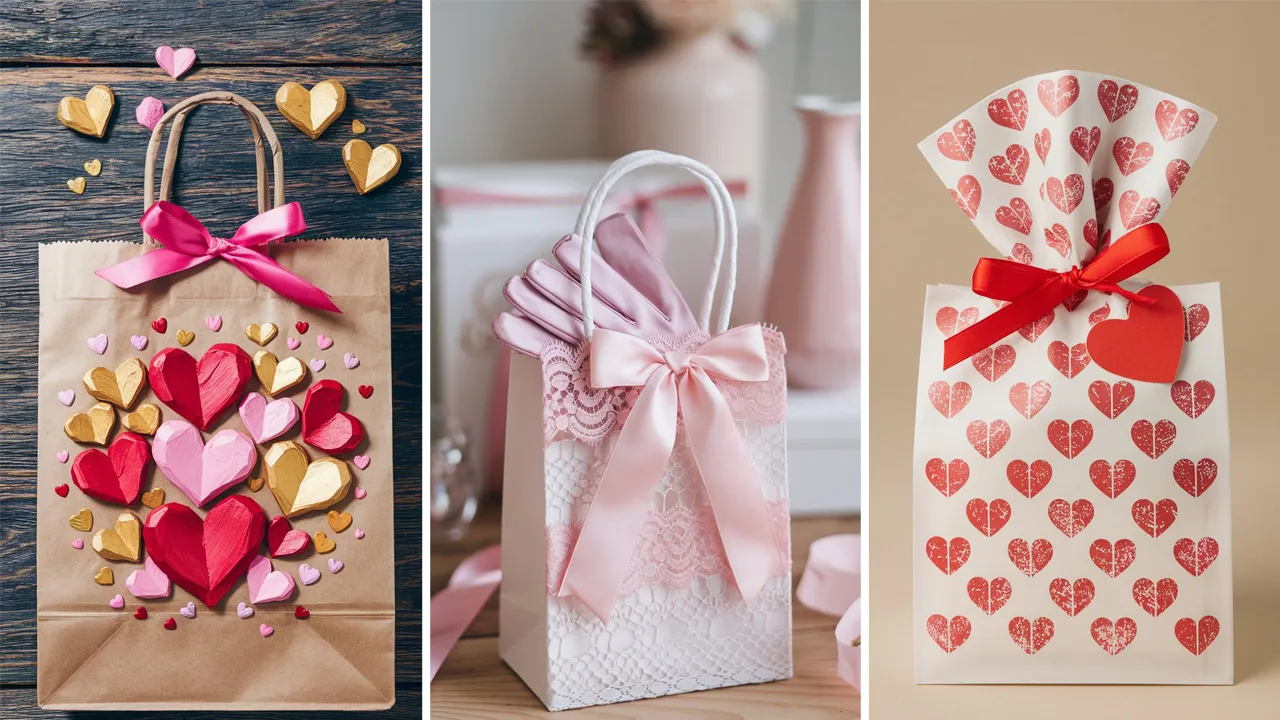
Valentine’s Day is all about showing love and appreciation, and a beautifully decorated gift bag can make any present feel extra special. By adding a personal touch to your gift bags, you can make your loved ones feel cherished. Here are 14 creative Valentine’s Day gift bag decoration ideas, each with detailed descriptions, steps, and tips to make them shine.
Table of Contents
1. Hand-Painted Hearts
Add a splash of love with hand-painted hearts on plain paper gift bags.

Steps
- Purchase plain kraft paper gift bags.
- Use acrylic paint and a small brush to paint hearts in various sizes and colors.
- Let the paint dry completely.
- Add a layer of clear varnish for a glossy finish (optional).
Tips
- Use a stencil for uniform hearts if freehand painting feels challenging.
- Mix metallic and matte paints for an eye-catching look.
2. Ribbon & Lace Embellishments
Give your gift bag a romantic vintage vibe with ribbon and lace.

Steps
- Attach lace trims to the top edge of a gift bag using double-sided tape or glue.
- Tie a decorative ribbon around the bag handles.
- Add a bow or small faux flower to enhance the look.
Tips
- Choose contrasting colors for the ribbon and lace to create depth.
- Use hot glue for stronger adhesion.
3. Glitter Accents
Add sparkle to your Valentine’s Day gift bags with glitter accents.

Steps
- Apply glue to the bag in desired patterns (hearts, swirls, or words like “LOVE”).
- Sprinkle glitter over the glue and shake off the excess.
- Let the bag dry before use.
Tips
- Work over a tray to catch excess glitter and minimize mess.
- Use fine glitter for intricate designs.
4. Personalized Name Tags
Add a personal touch with custom name tags on your gift bags.

Steps
- Cut out heart-shaped tags from cardstock.
- Write the recipient’s name using calligraphy or decorative lettering.
- Attach the tag to the bag handle with twine or ribbon.
Tips
- Use metallic pens for a touch of elegance.
- Layer tags with different colored cardstock for a 3D effect.
5. Stamped Designs
Create custom patterns on your gift bags using stamps.

Steps
- Purchase or create Valentine-themed stamps (hearts, arrows, roses).
- Use ink pads in red, pink, and metallic colors.
- Stamp your design onto the bag in a repeating or random pattern.
Tips
- Test your stamp on scrap paper before applying it to the bag.
- Combine different stamps for a layered look.
6. Tissue Paper Flowers
Add dimension to your gift bags with tissue paper flowers.

Steps
- Create small tissue paper flowers in your desired colors.
- Attach the flowers to the bag using glue or double-sided tape.
- Arrange the flowers in clusters for a fuller look.
Tips
- Use multiple layers of tissue paper for more voluminous flowers.
- Mix different sizes for added interest.
7. Washi Tape Patterns
Use colorful washi tape to create fun and unique designs on your gift bags.

Steps
- Choose Valentine-themed washi tape in coordinating colors and patterns.
- Cut the tape into strips and arrange them in stripes, chevrons, or other patterns.
- Smooth out the tape to avoid wrinkles.
Tips
- Layer different tapes for a more dynamic design.
- Trim excess tape with scissors for a clean finish.
8. Button Embellishments
Add a playful touch to your gift bags with colorful buttons.

Steps
- Select buttons in Valentine colors (red, pink, white).
- Arrange them in heart shapes or other patterns on the bag.
- Glue the buttons in place securely.
Tips
- Use flat-back buttons for easier application.
- Mix sizes and textures for a whimsical effect.
9. Faux Flower Accents
Attach faux flowers to your gift bags for a touch of elegance.

Steps
- Select small faux flowers in Valentine’s colors.
- Arrange them on the bag handles or front.
- Secure with hot glue or wire.
Tips
- Choose flowers with wire stems for easier attachment.
- Combine with ribbons for a layered look.
10. Cut-Out Windows
Create a peek-a-boo effect with cut-out shapes on your gift bags.

Steps
- Draw a heart or other Valentine shape on the bag.
- Cut out the shape carefully with a craft knife.
- Line the inside of the bag with colored or patterned paper.
Tips
- Use a cutting mat to protect your work surface.
- Secure the lining paper with tape or glue to keep it in place.
11. Fabric Wrap Accents
Wrap parts of your gift bag in fabric for a cozy and unique look.

Steps
- Cut fabric scraps into rectangles or strips.
- Glue or tape the fabric onto the bag as accents.
- Add bows or buttons for extra detail.
Tips
- Choose fabrics with Valentine’s patterns for added charm.
- Use fabric glue for a seamless finish.
12. Chalkboard Labels
Create reusable chalkboard gift tags for a practical and stylish touch.

Steps
- Purchase chalkboard labels or paint a tag with chalkboard paint.
- Write a message or the recipient’s name with chalk or a chalk marker.
- Attach the tag to the bag with ribbon or twine.
Tips
- Use a damp cloth to easily erase and rewrite messages.
- Decorate the chalkboard tag with small doodles for added flair.
13. Stenciled Designs
Use stencils to add professional-looking designs to your gift bags.

Steps
- Place a stencil on the bag and secure it with tape.
- Apply paint or ink over the stencil with a sponge or brush.
- Carefully remove the stencil and let the bag dry.
Tips
- Clean the stencil between uses to avoid smudges.
- Layer stencils for intricate designs.
