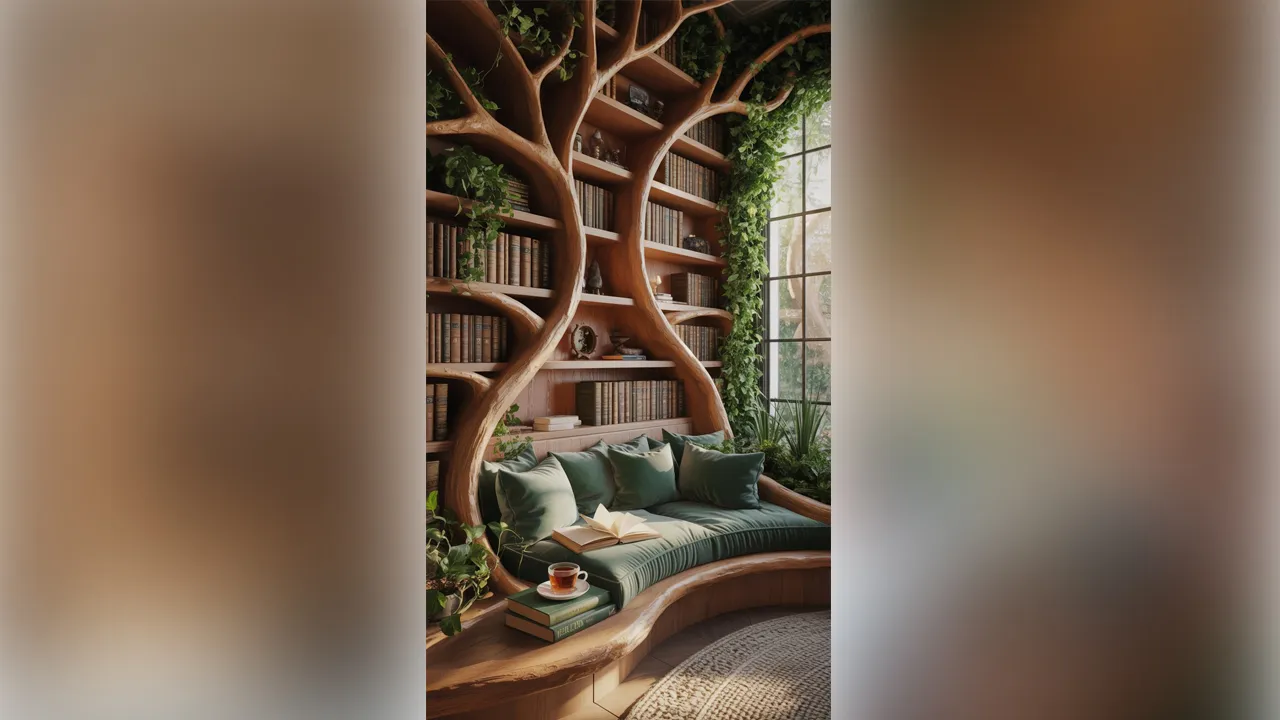
This project aims to create a cozy, nature-inspired home library with a built-in seating area and a unique tree-like bookshelf structure, reminiscent of a whimsical forest retreat.
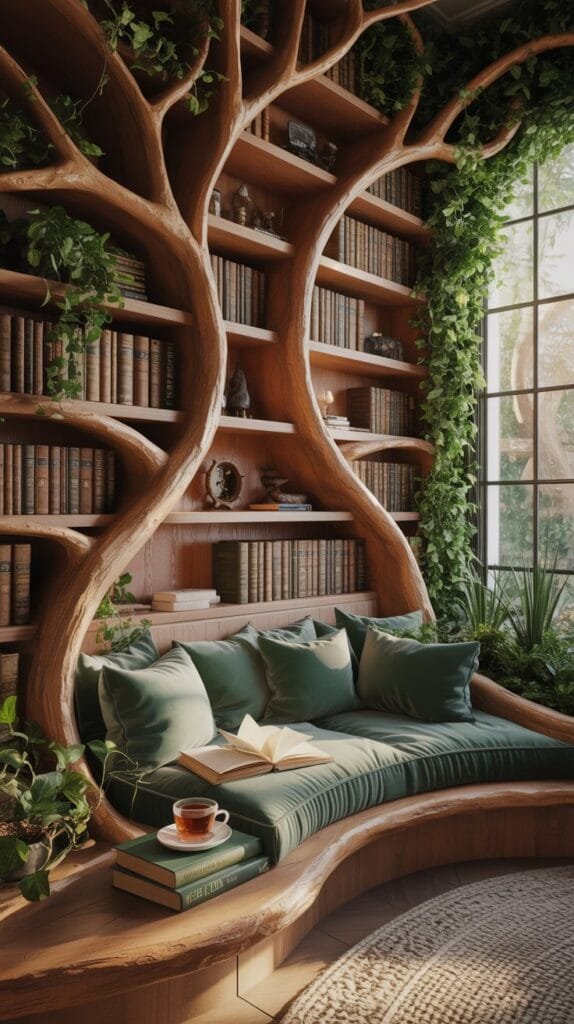
Table of Contents
I. Budget
Creating a custom space like this can vary significantly in cost depending on materials, whether you DIY or hire professionals, and the level of detail you want to achieve. Here’s a general breakdown:
- Low Budget (DIY with repurposed materials): $1,000 – $3,000 (Focus on salvaged wood, basic tools, and simple upholstery)
- Medium Budget (Mix of DIY and professional help, new materials): $3,000 – $10,000 (Quality wood, some custom fabrication, basic upholstery)
- High Budget (Professional design and build, premium materials): $10,000+ (High-end wood, expert craftsmanship, integrated lighting, custom cushions)
Key Cost Drivers:
- Woodwork: The most significant cost. Custom curved shelving and tree-like structures require skilled carpentry or CNC routing.
- Upholstery: Custom cushions and seating will add up.
- Lighting: Integrated LED strips can enhance the ambiance.
- Plants/Greenery: Real or high-quality artificial plants.
- Tools: If DIY, consider renting specialized tools.
II. Required Items/Materials
A. For the Tree Bookshelf Structure:
- Wood:
- Plywood (1/2″ to 3/4″ thick): For the structural backbone and shelving. Opt for furniture-grade plywood for a smoother finish.
- Solid Wood (various thicknesses): For the “tree trunk” elements, branches, and facing. Hardwoods like oak, walnut, or maple would be ideal for durability and aesthetics, but pine or poplar could be used for a more budget-friendly option, especially if stained.
- Wood Veneer (optional): If using a less expensive wood for the core, veneer can provide a high-end finish.
- Fasteners:
- Wood screws (various lengths)
- Wood glue
- Brad nails or finishing nails
- Finishing Materials:
- Wood stain or paint (to achieve your desired wood tone)
- Wood sealer/polyurethane (for protection and durability)
- Wood filler
- Sandpaper (various grits)
B. For the Built-in Seating Area:
- Plywood (3/4″ thick): For the base and frame of the bench.
- Foam Inserts: High-density foam for the seat and back cushions.
- Upholstery Fabric: Durable and comfortable fabric (e.g., velvet, linen, heavy cotton blend) in a color that complements your aesthetic.
- Batting: For wrapping foam and giving a softer look.
- Heavy-duty Staples & Staple Gun: For attaching fabric.
- Upholstery Thread & Needle (if sewing covers):
- Zippers (optional): For removable cushion covers.
C. For Greenery and Ambiance:
- Indoor Plants: Trailing plants (Pothos, Philodendron, Ivy), ferns, or small shrubs to weave through the structure.
- Plant Pots/Holders: To integrate the plants.
- Grow Lights (optional): If natural light is limited for real plants.
- LED Strip Lighting: Warm white or tunable white LED strips to highlight shelves and create ambiance.
- Small Decorative Items: Clocks, sculptures, or other personal touches for the shelves.
D. Tools:
- Power Tools:
- Circular saw or Table saw (for cutting large sheets of plywood)
- Jigsaw (essential for curved cuts)
- Router (for shaping edges and creating grooves)
- Drill/Driver
- Orbital sander
- Brad nailer (optional, but very helpful)
- Hand Tools:
- Tape measure, level, speed square
- Clamps (various sizes)
- Wood chisels
- Utility knife
- Stud finder (for mounting to walls)
- Safety Gear: Safety glasses, dust mask, hearing protection.
III. How to Make It
This is a complex project. Consider hiring a skilled carpenter or woodworker if you’re not experienced with custom fabrication.
Step 1: Planning and Design (Crucial!)
- Measure Your Space: Accurately measure the wall where you plan to build the library. Note ceiling height, window dimensions, and any obstructions.
- Sketch and CAD: Create detailed sketches. Ideally, use a CAD program (even a free one like SketchUp) to design the exact dimensions and curves of your tree structure and shelves. This will help with material estimates and cut lists.
- Determine Tree Structure: Decide on the number of “trunks” or main branches, their thickness, and how they will connect to the shelves.
- Shelf Layout: Plan the spacing and depth of your bookshelves based on your book collection.
- Seating Dimensions: Design the bench depth, height, and curve to be comfortable for reading.
- Lighting Integration: Plan where you want to embed LED strips (e.g., under shelves, along the tree branches).
Step 2: Building the Tree Bookshelf Structure
- Template Creation: Based on your design, create full-scale templates of the main tree trunk and branch curves on large sheets of paper or thin plywood.
- Cutting the Tree Elements:
- Core: Cut the main structural elements (tree trunks and major branches) from plywood using your templates and a jigsaw. You might need to laminate multiple layers of plywood for thickness and strength.
- Facing/Detail: Cut thinner pieces of solid wood or veneer to overlay the plywood core, giving the “tree” its organic shape and smooth finish. Use a router to create rounded edges and details.
- Constructing Shelves:
- Cut shelf pieces from plywood or solid wood.
- You’ll need to notch or dado the shelves to fit into the tree structure, or create cleats/supports for them to rest on.
- Consider reinforcing longer shelves to prevent bowing.
- Assembly:
- Mounting: Securely attach the main tree trunk elements to the wall studs using strong screws. This is critical for stability.
- Attaching Branches and Shelves: Carefully attach the branches and shelves to the main structure using wood glue and screws. Use clamps while the glue dries. Ensure all shelves are level.
- Finishing Details: Fill any gaps or screw holes with wood filler. Sand all surfaces smooth, progressively moving to finer grits.
Step 3: Building the Built-in Seating Area
- Frame Construction:
- Build a sturdy frame for the bench using plywood. This will likely be a curved box structure.
- Ensure the height is comfortable for sitting.
- Consider adding storage underneath with lift-up lids or drawers.
- Attaching to Bookshelf: Integrate the bench frame seamlessly with the base of your tree bookshelf structure, providing a continuous, flowing line.
- Upholstery:
- Cut Foam: Cut the high-density foam to the exact dimensions of your bench seat and back (if applicable).
- Wrap with Batting: Wrap the foam with batting for a softer feel.
- Cut Fabric: Cut your upholstery fabric, allowing for seam allowances and enough to wrap around the foam and batting.
- Sew Covers (Optional but Recommended): If you want removable covers, sew them with zippers. Otherwise, you’ll be directly stapling the fabric.
- Attach Fabric: Carefully pull the fabric taut over the foam and batting, and staple it securely to the underside of the bench frame using a heavy-duty staple gun. Ensure smooth, even tension.
Step 4: Finishing Touches
- Staining/Painting: Apply your chosen wood stain or paint to the entire bookshelf and visible wood of the bench. Follow manufacturer’s instructions for drying times and multiple coats.
- Sealing: Apply several coats of wood sealer or polyurethane for protection and durability.
- Lighting Installation: Install LED strip lighting along the shelves and tree branches. Conceal wiring as much as possible.
- Plant Integration:
- Strategically place your chosen plants. You might need to create small recessed areas or holders within the structure for pots.
- If using real plants, ensure they receive adequate light (consider grow lights if needed) and that you have a watering plan that doesn’t damage the wood.
- Decorate: Arrange your books, a cozy blanket, decorative items, and a reading lamp to complete your enchanted library.
IV. More on My Behalf (Tips and Considerations)
- Safety First: Always wear appropriate safety gear when working with power tools. If you’re unsure about any step, consult a professional.
- Curved Woodworking: Achieving those beautiful curves is the most challenging part.
- Steam Bending: For truly organic, flowing shapes, steam bending solid wood is an advanced technique.
- Laminating Thin Strips: Gluing multiple thin strips of wood together over a form can create strong, curved elements.
- CNC Routing: For the most precise and complex curves, consider having a professional CNC router cut the plywood components. This might be more cost-effective than extensive manual work for complex designs.
- Lighting Ambiance:
- Warm White LEDs: Create a cozy and inviting atmosphere.
- Dimmable Lights: Allow you to adjust the mood.
- Integrated Lighting: Consider routing channels within the wood for seamless LED strip installation.
- Plant Selection:
- Low-Maintenance Plants: If you’re not an avid gardener, opt for low-maintenance plants like Pothos, Snake Plants, or ZZ Plants.
- Artificial Plants: High-quality artificial plants can look incredibly realistic and require no maintenance.
- Comfort is Key:
- Cushion Density: Don’t skimp on good quality, high-density foam for the cushions. It makes a huge difference in comfort and longevity.
- Fabric Choice: Select a durable and soft fabric that you’ll enjoy lounging on.
- Accessibility: Consider how easy it will be to access books on higher shelves. A small, decorative library ladder could be a functional and aesthetic addition.
- Professional Help: For a project of this scale and detail, especially with the intricate woodworking, hiring a professional carpenter or custom furniture maker can save you significant time, frustration, and ensure a high-quality, safe, and durable result. They can also advise on the best materials and construction methods for your specific design and budget.
- Soundproofing (Optional): If your library is in a noisy area, consider adding some sound-absorbing materials to the walls or ceiling for a more peaceful reading experience.
- Electrical Outlets: Plan for convenient electrical outlets for charging devices or plugging in a reading lamp.
This project is a true labor of love, but the result – a personalized, enchanting reading sanctuary – would be incredibly rewarding! Good luck!